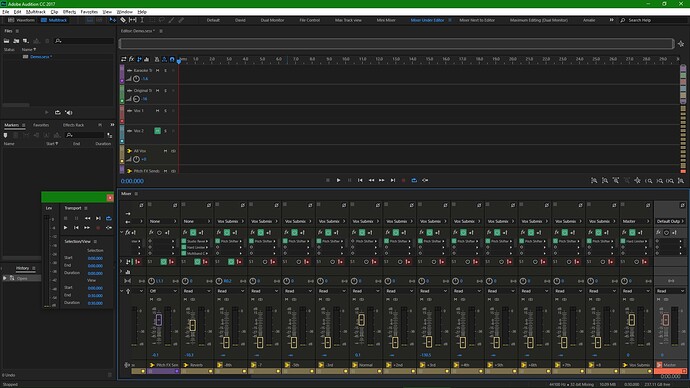
My custom workspaces

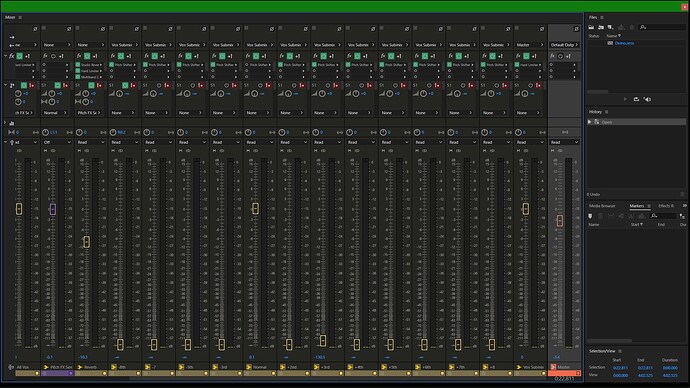
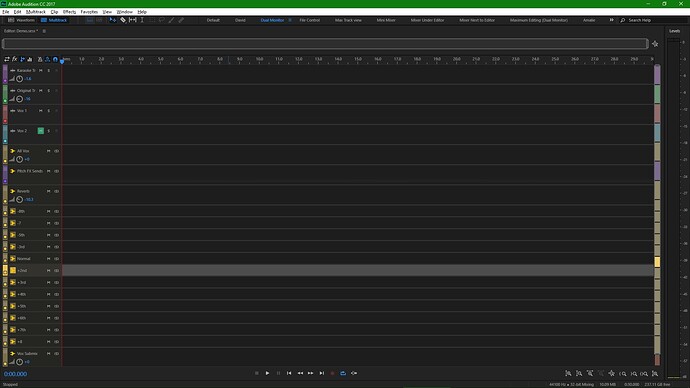
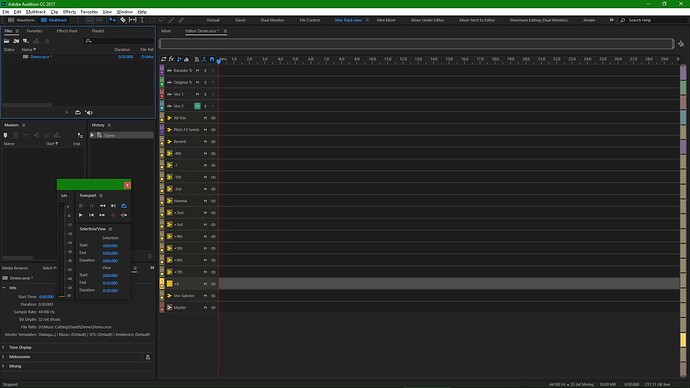
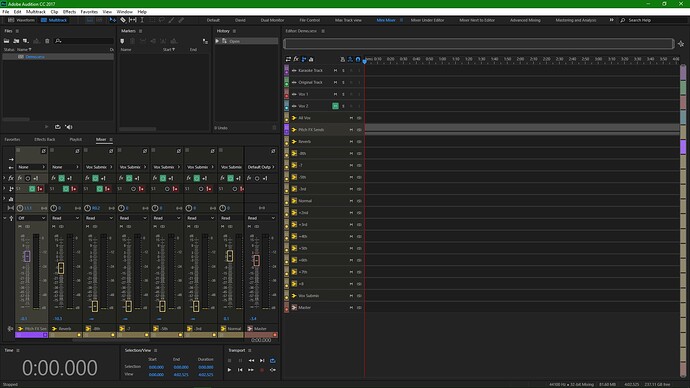
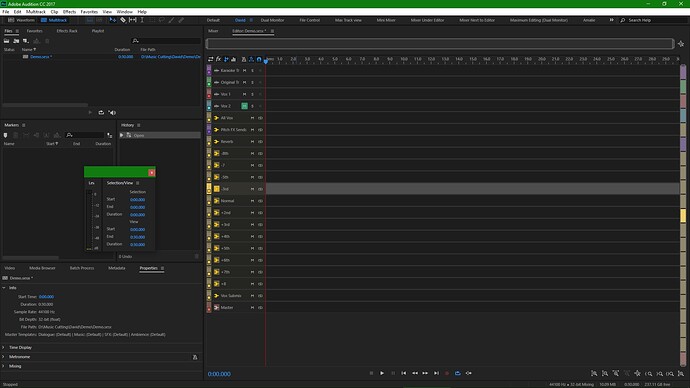
Hi everyone. In my usual Shortcuts style, I’ve taken some screen shots of the various workspaces I have made the save me some production time and not faffing around looking for things during my workflow.

If you want to know how I created the floating toolbox with the meters, transport, and Selection/View, do this:

  1. If any of those 3 panels are docked, undock them
  2. If none are visible, go to Window, Transport. If it is docked somewhere, click the 3 bars to the right of the name and choose Undock .
  3. Find or open the Selection/View window and drag it under the Transport panel until the bottom turns blue and release the mouse. We can adjust sizes later.
  4. Do the same for the meters, but this time, drag the panel to the left side of the Transport and Selection/View panels until it turns green and release the mouse. This will make it take up the entire height of the floating toolbox.
  5. Now you’ll need to do a little fiddling with getting the panel windows the right size. They are finicky in which side you drag the panel edges but when you have got exactly what you want, save the workspace with a custom name so you don’t lose your design.

Some tips on using Workspaces:

  1. Once you have designed Workspace, give it a name by clicking on the currently highlighted Workspace name’s hamburger menu.
    It is Essential you click on the current one, otherwise what you just designed will be lost and the different workspace you have clicked on will appear.

  2. After clicking on the hamburger lines and a menu will popup.

  3. Choose “Save as New Workspace…” Give it a descriptive name and hit OK.

  4. If you want to create a different workspace:
    Make the changes you would like to make, and repeat from step 1.

  • If you play around with a workspace and have messed it up, click the menu of the currently selected workspace and click Revert to Saved Layout.

  • If you like the layout of a current Workspace that you’ve changed to your liking, click that menu again and choose “Save Changes to this Workspace”.

A Zip file of them is here!

https://drive.google.com/open?id=0B_5rkwj5xySCZVlXeUZHc3hkcm8

But beware, it is possible to overwrite any existing Workspaces you have made or changed. If you know how to avoid filename conflicts, that is the only way around it for now. If you don’t know how to avoid them, I am awaiting on Ole to see if he may have a better solution than I have.

The location of the folders for the Workspaces are shown in a later post below by Ole. But for an example for Windows users, I’ll paste mine:

C:\Users\David\AppData\Roaming\Adobe\Audition\10.0\Workspace\Saved Workspaces

My Workspaces:


David

My most frequently used.


Dual Monitor

Left Monitor

Mixer, Files, History, Markers, Selection/View

Right Monitor

Tracks only


File Control

Minimal track view (enough to drop a file into) and lots of file and folder view information.


Max Track View

Similar to my David one. No transport controls down the bottom to allow maximum view of the tracks, and a floating toolbar of Levels, Transport, and Selection/View.


Mini Mixer

Shows what it says.


Mixer Under Editor

More tracks to change with the mixer but minimal track view.
Small tradeoff if you want maximum mixer view and don’t need to see everything that’s playing.


Mixer next to Editor

Think of this one as the Dual Monitor on one monitor.


Again, download them and beware of filename conflicts.
You’re welcome to copy these designs and customise them to your hearts content.
And don’t forget to save them with different names every time you create a different design.

Enjoy!

David
5 Likes

Thank you Very much @Fluffman71 it’s awesome!

Been waiting for these @Fluffman71. To make things easier could you upload these in a zip file or something? Here’s a guide to finding them and installing them:

Windows:
C:\Users[username]\AppData\Roaming\Adobe\Audition[YourVersionNumber]\Workspace\Saved Workspaces
In there are XML files for all your custom workspaces, put those in a zip file and upload them, from there people can download them and add it to the same directory on their system and audition will load them.
A shortcut to reach the AppData folder is to type this into the location input field in windows explorer: %APPDATA%

OS X:
/Users/[User_Name]/Library/Preferences/Adobe/Audition/[YourVersionNumber]/Workspace/Saved Workspaces
From here it is the same as on Windows, XML files that can be copied and shared.
An easy trick for getting to the current user’s library folder is to hold the “Alt” key while pressing the “go” option in the Finder menu bar and choosing “Library.”

Once again thank you, I will be giving these a try!

1 Like

Hi Ole.
Yes I have definitely planned to do that. The screenshots have been too long a time coming so I pushed them out ASAP. I’ll hopefully get to the XML files today and shove them in a Zip file also ASAP.

1 Like

Hi Ole.

I now remember why I have taken so long in getting these screenshots up. I have concerns regarding the actual names of the Workspaces. I fear the names I have of mine will overwrite any existing ones the user might already have. If they aren’t apt at dealing with filename conflicts, it could make things messy.

I’ll upload my Zip of them anyway and if you can work out an easy foolproof method for the basic user, I’m all ears.

Today I tried some ‘refresh’ methods like deleting “WorkspaceManagerConfig”, all the WorkspaceXX files in ‘Archived Workspaces’ and ‘Saved Workspaces’ and pasting in my custom ones to ‘Saved Workspaces’.

It did work, but it now just meant doing some Workspace management in Audition in organising where I wanted each workspace name to appear on the toolbar, which isn’t all that hard for those who know how to do it.

That is probably the only clean way to do it (that I know of), except if the user has already made their own Workspaces or edited existing ones.

If you can think of a way to do it, I’d love to hear it.

Perhaps change the 1 to 8 suffix numbers and add 20 to each of them so they are not conflicting with anything already possibly existing. I’ve not tried it and don’t want to mess around with it anymore for now. Too much brain work on just one thing when there are other things to get done.

I’ve made them and have Zipped them, and will put them in my first post. For those who know what they’re doing, they can download them and take note of the warnings.

Thanks.
David.

I’m working on an app for exporting and importing favorites into Audition. But I haven’t thought of making anything like that for workspaces… What you mentioned will work for now though. I might look into better methods in the future, like an install script that automatically resolves conflicts.

I wish you the very best of luck. From watching how the files update their “Date Modified” and their oddly numbered files, it meant I had to load each file into Notepad++ to see which was which. It wasn’t a quick process.

When I did my ‘clean sweep’ and erased every Workspace file used by Audition, including the Workspace Manager file, and then copied my custom ones back into the Saved Workspaces folder, they were sequentially numbered from 1 to 8 for a suffix with no extra numbers in there. So it did a clean reset. And obviously Audition rebuilt the Manager.

Previously I had incidental numbers between 9 to 21 in the folder. And I’ve deduced they are the built-in Workspaces provided by Audition that have been modified by myself and saved. I don’t even use them anymore. They are stored in the Hidden section of the Workspace Manager menu.

It is a pain that it only gives the Workspace files sequential numbers and not the name of the Workspace you gave it as a suffix. The name of the Workspace is inside the file - if you search for “UserName” you will find the Workspace name under that.

What is also a pain is the Workspace Manager simply refers to the Workspaces by their numbers also - no custom names used. They’re all in the Workspace files themselves as I already mentioned.

Anyway, best of luck with it. You sound like you have the skills and knowledge of how to work it out. My brain power has gone in the way of analytical programming. But then, I don’t do it every day anymore, so that would be why.

Talk soon!
David.

Hi friends, @OleHenrik and @Fluffman71 I downloaded the Zip file and the only thing that I had to do was rename them by changing the last number (ascending way by taking my last number at the APPDATA folder as a base for the new files). I did not have any conflicts with my workspaces, they were added as new ones with the name that David use at his work station.

@Fluffman71 thank you for these and I can’t wait to try them out myself!

Fantastic to hear you got it working so easily, @Juanmapinker! Hopefully more users can be as successful as yourself.

Again, thank you so much!